Linux on the M1, with GPU acceleration
— M1 — 2 min read
Apple recently released new MacBook Pros using their incredible M1 (Pro|Max) chips.
Those chips are really impressive. However, MacBooks ship with macOS, an operating system several of us consider much less impressive.
Let's run Linux on them!
Table of Contents

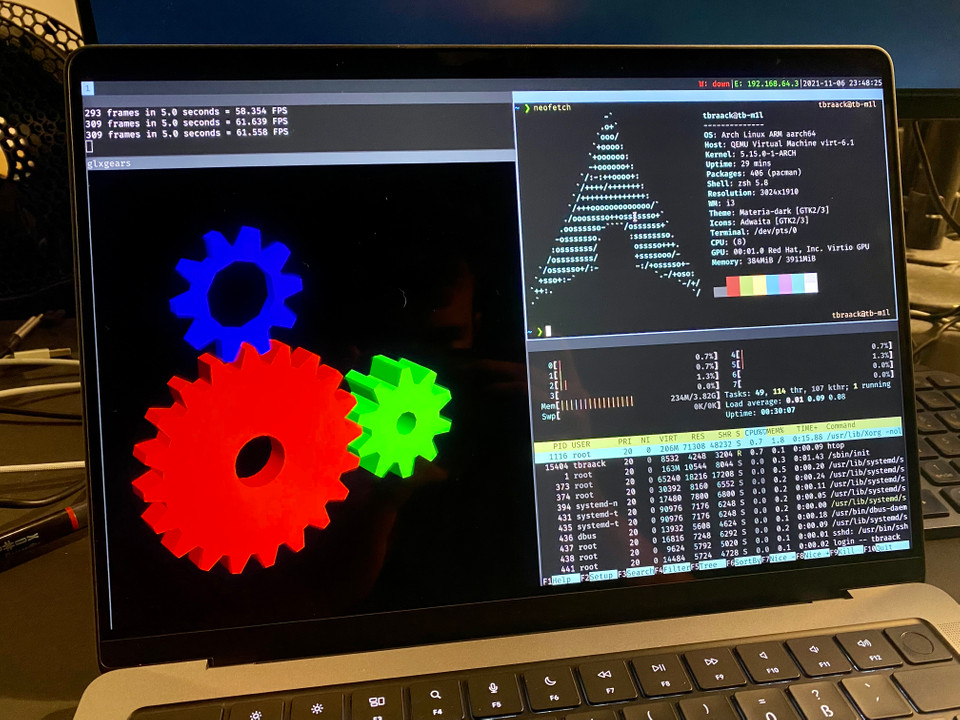
glxgears and neofetch running in virtualized ArchLinux.Options
Natively
The Asahi Linux project is working really hard on bringing a first class Linux experience to the M1 hardware.
Looking on their most recent progress report reveals it has come a lot of way already.
The lack of accelerated graphics and overall driver situation, especially on the laptop models, sadly disqualify it as a daily driver for the time being.
Virtualized
QEMU to the rescue! More specifically, UTM provides a version of QEMU specifically tailored towards M1 Macs (along with fancy GUI).
Most importantly, it ships a virtual graphics mode virtio-ramfb-gl, enabling accelerated graphics on most modern Linux out of the box.
Setup
We are going to use the following:
| Device | MacBook Pro 2021 |
| CPU | M1 Pro |
| RAM | 16GB |
| Disk | 1TB |
| OS (Host) | macOS 12.0 |
| OS (VM) | ArchLinux ARM |
| Hypervisor | UTM v2.4.0 |
Preparing ArchLinux ARM
Unlike the official ArchLinux project, ArchLinux ARM does not come with a USB installer. Instead, we are going to create a bootable disk ourselves.
Requirements: fdisk, kpartx, qemu-img, bsdtar. Suggested to use any other Linux machine for the following.
Installation procedure based on this Gist. The following is very concise and intended for experienced Arch users.
$: normal user, #: root user
0. Download
In some suitable folder run:
1$ curl -LO http://os.archlinuxarm.org/os/ArchLinuxARM-aarch64-latest.tar.gz1. Disk
First, partition and mount a new image:
1$ qemu-img create alarm.img 32G23$ fdisk alarm.img4 then create the following:5 - gpt partition table6 - 200MB+ EFI partition7 - root partition (rest of disk)89# kpartx -av alarm.img10# mkfs.vfat /dev/mapper/loopXp111# mkfs.ext4 /dev/mapper/loopXp21213# mount /dev/mapper/loopXp2 /mnt14# mkdir /mnt/boot15# mount /dev/mapper/loopXp1 /mnt/boot2. OS
Next, extract ArchLinux ARM onto it:
1# bsdtar -xpf ArchLinuxARM-aarch64-latest.tar.gz -C /mntCorrectly set disk UUIDs in /etc/fstab (use blkid to get yours):
1/dev/disk/by-uuid/XXXXXXXX-XXXX-XXXX-XXXX-XXXXXXXXXXXX / ext4 defaults 0 02/dev/disk/by-uuid/XXXX-XXXX /boot vfat defaults 0 0Because we cannot set EFIVARS in advance, we need to use a fallback /boot/startup.nsh (fill in your ext4 UUID):
1Image root=UUID=XXXXXXXX-XXXX-XXXX-XXXX-XXXXXXXXXXXX rw initrd=\initramfs-linux.img3. Finish
First, unmount:
1# umount -R /mnt2# kpartx -d alarm.imgThen, convert to .qcow2 (much smaller):
1$ qemu-img convert -O qcow2 alarm.img alarm.qcow2Transfer that .qcow2 to your M1 Mac then.
VM creation
Continue now on your M1 Mac.
Open UTM, create a new VM (from scratch) and set the following:
| System | |
|---|---|
| Architecture | aarch64 |
| CPU | Cortex A72 |
| Cores | 8 (# performance cores) |
| UEFI | yes |
Drives
Import Drive, then select your alarm.qcow2
| Display | |
|---|---|
| Type | Full Graphics |
| Hardware | virtio-ramfb-gl |
| Fit-to-Screen | yes |
| Retina Mode | yes |
UTM supports other hardware accelerated GPU types apart from virtio-ramfb-gl, but in my testing they either did not boot at all, or had worse performance.
Installation
Power up the VM, it should drop into the UEFI shell, but boot Linux shortly after.
Login as root:root. Linux is basically installed by this point, but some setup
is still left:
1# pacman-key --init2# pacman-key --populate archlinuxarm3# pacman -SyuTo avoid relying on the the UEFI startup.nsh fallback, setup a bootloader
using EFIVARS:
1# efibootmgr --disk /dev/vda --part 1 --create --label "Arch Linux ARM" --loader /Image --unicode 'root=UUID=XXXXXXXX-XXXX-XXXX-XXXX-XXXXXXXXXXXX rw initrd=\initramfs-linux.img' --verboseAbove uses the EFISTUB functionality of the Linux kernel. Alternatives include systemd-boot, grub2, etc. and work perfectly fine as well.
By this point, ArchLinux ARM is installed. As always, consider following the General Recommendations and setup the system to your liking.
i3 desktop
Obviously we need a desktop enviroment to actually use this. I prefer i3, but choose whatever you like:
1# pacman -S i3 xorg-server xorg-init2$ startxThere are no special drivers required, X11 works out of the box.
A bit of .xinitrc is needed though:
1# load system wide xinit2if [ -d /etc/X11/xinit/xinitrc.d ] ; then3 for f in /etc/X11/xinit/xinitrc.d/?*.sh ; do4 [ -x "$f" ] && . "$f"5 done6 unset f7fi89# screen layout10modename="3024x1910_60.00"11xrandr --newmode $modename 493.75 3024 3264 3592 4160 1910 1913 1923 1979 -hsync +vsync12xrandr --addmode Virtual-1 $modename13xrandr --output Virtual-1 --mode $modename1415# HiDPI16xrdb -merge ~/.Xresources1718# start i319exec i3HiDPI
The MacBook Pro 2021 uses a display with a whopping 3024x1964 pixels and 254 dpi. To avoid everything being incredibly small, the following appears to work well:
1Xft.dpi = 1921export GDK_SCALE=22export GDK_DPI_SCALE=0.53export QT_AUTO_SCREEN_SCALE_FACTOR=1Performance
It's fast! Like, really. Consider these Geekbench scores:
| Native (macOS) | Linux | Cost % | |
|---|---|---|---|
| Single-Core | 1771 | 1652 | -6.7% |
| Multi-Core | 12455 | 9064 | -27.2% |
But what about the GPU? I did not find any benchmarking tool that runs on both operating systems, but I compared the fps of the WebGL Aquarium:
| # Fish | Native (macOS) | Linux |
|---|---|---|
| 1000 | 60 | 60 |
| 5000 | 60 | 49 |
| 10000 | 60 | 26 |
| 15000 | 56 | 17 |
| 20000 | 42 | 14 |
| 25000 | 30 | 11 |
| 30000 | 26 | 10 |
As expected for a virtualized GPU, performance decreases quite a lot.
However, we did not come for 3D intensive tasks, but for some OpenGL to smoothly browse the web and watch the one or another YouTube video.
And it does that perfectly fine at 60fps, without any noticeable slowdown!